Thigh-high boots are stylish and classy. The confidence they give you is second to none, but when they slouch! That’s a problem. If you are thinking about what to do, then you’ve come to the right place.
In this article, I’ll be discussing some of the most comfortable and most efficient ways to keep your thigh-high boots up. So, without further delay, let’s get straight into the guide.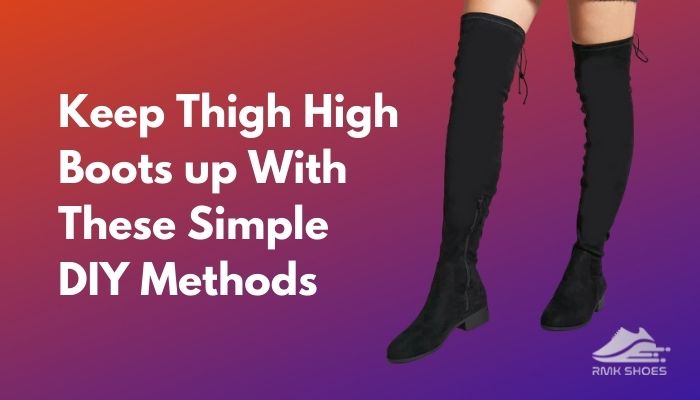
Keep Thigh-High Boots Up- Guidelines
Thigh-high boots add a whole new dimension to autumn and winter wears. The issue arises with the slouch! No worries, follow these simple methods, and save yourself from yanking up your boots all day long.
Here are the easiest ways to keep your thigh-high boots from slouching:
Method-1: Make a BootStrap/Boot Bra
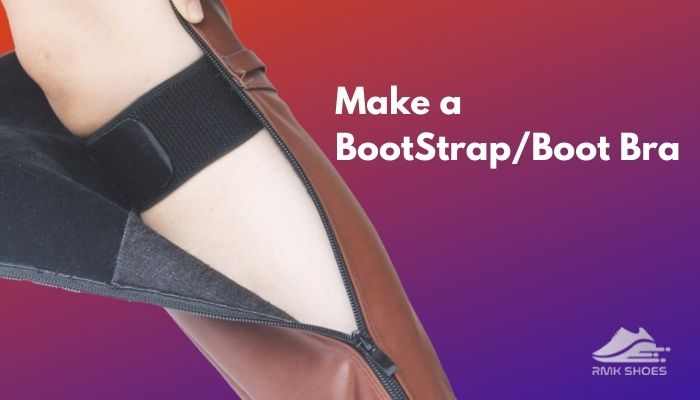
Boot Bra’s a useful tool to prevent your boots from slouching. Making it’s relatively easy, just be patient, and it’ll back you up all day long.
Requirements:
- Velcro
- Elastic
- E 600 Glue
- Scissor
Here are the steps to make a perfect boot bra:
- Take the elastic and wrap around each of your thighs. Measure half an inch below where your boots hit your thigh
- Stretch the elastic with your finger to ensure enough space between the elastic and your thigh. It should be tight but not uncomfortable tight.
- Use the fabric marker to mark the place where you need to cut the elastic.
- Repeat the procedure for the other thigh.
- Once you’re done, attach each of the elastic with the glue to form two elastic loops.
- Put the strap around your Place them about ½ inch below where your boots hit your thigh.
- Place one part of the Velcro to your strap and the other to the side of your boot.
- While putting on the boot, make sure the Velcro aligns appropriately.
- Gently press them for the best fit.
- Now you have yourself a bootstrap/boot bra that’ll prevent your boot from slouching.
But before that, go through our epic guide How Should Tactical Boots Fit.
Method-2: Use Fashion Glue
As you can guess by the name, it’s a (specialized) glue designed for the fashion industry. It’s widely used in beauty pageants and fashion shows all over the world. It’s used directly on the skin to prevent any of your clothing from sliding up or down.
It’s an easy method and does not cost much. Just get yourself a fashion glue and follow the lead.
Follow the steps to apply fashion glue properly:
- Put on your boots and keep a check on how far the ends reach your thigh.
- Take the fashion glue and apply a decent amount to your thighs (where the ends of your boots reach). Add a thick layer for better results.
- Once you’ve applied the glue, let it sit for 10-12 seconds.
- Once you’ve put your boots on, allow the glue to stick with your shoes. Stay in a stable position as much as you can until the glue dries. Use your hands to apply pressure to the ends of your shoes against your thigh for faster results.
- If the time to remove your boots arrives, gently pull the ends of your thigh. You can gently wiggle out of your shoes as well. Be careful not to apply too much pressure as there’s a risk of skin injury.
- Use a cloth soaked in warm water and wipe off the excess glue of your thigh.
- Using a towel dry off the excess moisture to get a completely dry and adhesive-free thigh.
Points to remember:
- Never apply regular glue to your skin; it’s strictly prohibited. Fashion glue is of specialized formula and therefore has no effect on your skin.
- If you’re allergic to any particular element, it’s always better to read the label.
- Let’s say you can’t read the label properly or confused regarding any particular ingredient. Take a little bit of the glue and apply it to your skin, then let it sit for 24 hours and see if you get any sort of allergic reaction.
Check out our separate post on why Do Logger Boots Have High Heels.
Method-3: Use Thick socks
A thick pair of socks closes the gap between your legs and your boot and creates a modest amount of friction, which prevents the boot’s upper part from slouching or sliding down.
Arguably the easiest one on the list! And one of the most commonly used hacks. Get yourself a pair of thick black (or any opaque) stockings and wear them under your boots. If you’ve got a different color on your mind, that’ll do as well.
Point to remember:
This method is more suited if you’ve got an almost perfect fitting of your boots, it’ll give that extra edge that you need.
Method-4: Fashion Tape
It’s a double-sided adhesive tape you can use to prevent your boots from slouching. It has made a name for itself in the fashion industry as a time saver.
Requirements:
- Fashion tape
- Scissor
Here are the quick and easy steps to use this handy tool.
- Put on your stockings.
- Set a point (on your thigh) just below where your boots end.
- Once you’ve selected your preferred position, apply the tape over each of your stockings.
- Now wear your boots over your stockings and fold the ends below the adhesive tape.
- Peel off the other strip from the tape and pull up the ends of your boots. Apply gentle pressure with your hands, so they stick properly.
Points to remember:
Once you’re done, stand up and check whether you’ve done it correctly. Walk around a little or give a gentle hop. If your boots slouch, repeats the process with more accuracy.
In a hurry? Check out my new post on Why do Special Forces Wear Hiking Boots.
Method-5: Replace the old elastic
Another efficient way to prevent your boots from slouching is by replacing the worn-out elastic from your boots. It’s an inexpensive method; all you need is some time and a bit of patience.
Requirements:
- Elastic band
- Seam Ripper
- Scissors
Follow these steps to replace the old elastic properly:
- Carefully observe how the ends of your boots are sewn on the inside and the outside.
- Using the seam ripper, carefully pick out the stitches one by one. Do it with the inside seams.
- Once you’ve carefully removed the stitches, it’s time to pull the old elastic.
- Gently pull out any stitches on the outside of your boots.
- Fold over the boot’s material, use the original line as the guide and leave an opening for the elastic.
- Carefully place the presser foot in the manner on the boot and stitch the edges properly. It should look like the original.
- Cut the new elastic less than two inches from the old one.
- Insert the new elastic inside the new casing you’ve just made. Once done, carefully sew the elastic and close the opening. Now you’re ready to go!
Method-6: Try An Elastic Hair Tie
This one’s a real time saver. Suppose you’re out in your day to day activity and find your boots slouching down! Simply use a hair tie around your knee and stop your shoes from slouching.
Method-7: Use Safety Pins
If you want something speedy and effective, then these little pins are here at your service. Here are the quick and easy steps of using safety pins.
Requirements:
- safety pins
Follow these steps to use safety pins:
- Put on your stockings.
- Keep your stockings just below the boot ends (similar to the adhesive tape).
- Wear the boots over your stockings (up to optimum position).
- Take a few (or according to your liking) safety pins and gently pin the ends of your boots to the stockings. Now you’re ready to rock.
Method- 8: Store them properly
You can also get a proper fitting out of your tall boots if you store them properly. You’ll just have to spend some bucks and get a gadget or two.
Stuff your boots using newspaper, boot trees, pool noodles, etc. The stuffing helps the boot keep its shape. Unstuffed boots tend to fold and create creases that become recurring problems.
Using boot clips, store your thigh-high boots individually. This keeps them upright and prevents them from folding over.
Check out the easiest way to know about Muck Boots Vs Bogs Boots.
Method-9: Make Your Boots Tighter
This handy technique applies only to leather (thigh-high) boots. You can shrink the fit of your precious footwear to a certain extent.
Here are the steps you’ve to follow:
- Fill tub full of water.
- Submerge your boots and keep them for an hour or hour and a half
- Take a pair of thigh-high sock and soak them in water.
- Out the wet socks on
- Pick up your boots from the tub and put them on as well.
- Continue to wear your boots until dry; they should shrink around your leg.
Common Questions People Ask
What are thigh-high boots called?
Thigh-high boots are also known as thigh-length boots or only thigh boots. These boots extend above the knees to at least mid-thigh.
Can tall boots be shortened?
Yes, Boots with zippers that can be clipped which come with a design that allows them to be shortened can be reduced to a certain extent. The finished edges won’t look exactly the same. As long as fitting’s your only priority, it shouldn’t matter.
Conclusion
There are many ways to keep thigh-high boots up. You can use the one that suits you. For a quick fix, you can use method-3 and 7.
If you have time, go for method-1 or 5. Whichever method you choose, maintain a certain level of precision. As starters, You can always start by storing your boots properly.
I hope the job of keeping your thigh-high boots has been made more comfortable with my guide. Do leave your valuable feedback in the comment section below. Take care!