When your expensive LED shoes get damaged after a few wear, It feels like someone has stabbed you in the chest. I have experienced this incident recently.
Right After this, I have researched it extensively and found some outstanding methods to escape this.
LED shoes are extremely sensitive to wear every day. You must wear fewer of these shoes than the regular ones. And must take good care of it.
I’m going to explain the whole fixing process step by step in this article so that you can fix your LED light shoes without any stress. One thing to remember is, Prevention is better than cure.
Now keep reading till the end to fix your problems on the first try.

Can Light Up Shoes Be Fixed?
Yes! Light-up shoes can be fixed. The light-up shoes generally run on battery power.
In most cases, the batteries went over just after using in a few weeks. Or maybe a problem with the battery and cable connection.
These problems are easy to fix. You can even switch the battery when the old battery runs out of power. You can also fix the other minor problems yourself sitting at home.
But if the damages are extreme, it’s better to take the shoes to a store or a light-up shoe expert.
It will reduce the risk of increasing the damages.
Follow our guide on how to Fix Squeaky Boots.
How To Fix LED Shoes?
High-quality LED shoes are much more expensive and sensitive to wear. You have to wear them for a limited time; otherwise, LED batteries will be over within a week.
You may fix the LED shoes several times, but It won’t provide you the same service as before. So you have to be very careful while using LED shoes.
Here are some instructions to fix your LED shoes:
Restore the battery
When you first notice that the LED lights have stopped working, you can apply this method to activate the lights again. First, test the batteries and then replace them with a new ones.
You can replace them with the usual equipment which you use in general repairing work. The batteries you need for these shoes are available in any store.

However, if your existing LED shoe’s battery is not matching with available ones, you may purchase it from an online store.
Another noticeable point is the battery compartment is convenient. And some batteries can be inserted in the bottom or some from the sides. So you can restore the battery on your own.
I’m gonna explain the changing steps below in a point. You can change the battery easily by following those steps.
Repair the wires
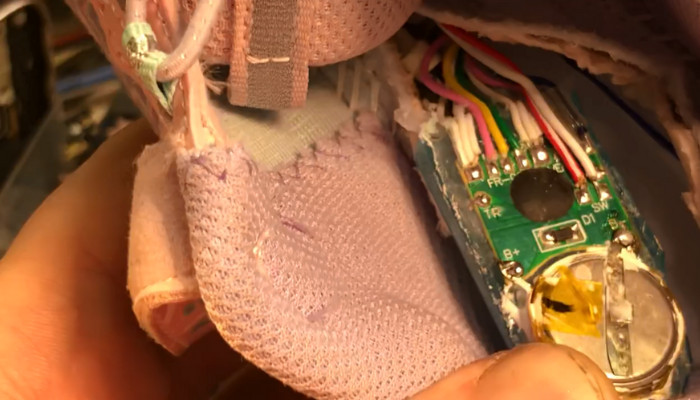
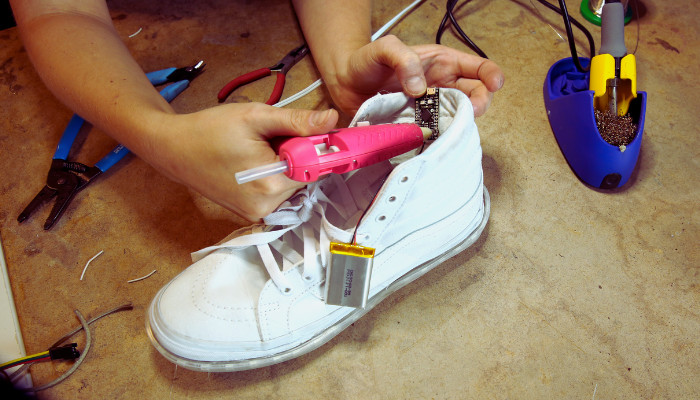
After restoring the batteries, if the lights are not still working, you have to test the wire connection. Examine the connection; if there is any disconnection between the wire lining and the stripe, you must fix it.
The inserting wires link to the battery and the charger port. If the connection is broken, the charger won’t work too.

All the wires are placed in the back sole. Some soles may moveable, or some may be fixed. For the moveable soles, you must get them out of the shoe to check whether the wires are in the right position.
Sometimes charger ports also cause a disturbance. You must repair it to get a good connection of wires.
Advance the connection
After ensuring a good connection and changing the batteries, the lights may not work properly. You have to check whether the batteries are touching the terminal rightfully or not.
If there is a gap between the terminal and the batteries, the connection may not work effectively.
There, my friend, you have to fill the gap with foam, fabric, cardboard or something like these things. You can use glue to attach them.
But using glue will connect the battery permanently. It will affect your battery-changing process. So avoid using glue unless you really need to. If your LED shoes are not fixable on yours, take them to a store for repair. It will save your LED shoes from further damage.
Read more on how to Fix Heel Slippage In Cowboy Boots.
What Are The Damages Of LED Shoes?
LED shoes are more sensitive than any other shoes in your everyday closet. LED shoes are inserted with a battery circuit in their heel. And the battery is irreparable.
So you must take proper care of LED shoes. Otherwise, they won’t be sustainable and will fall down within short periods.
These are the most damages that can happen to your LED shoes:
Heat
Warmness is one of the major enemies of your LED shoes. Excessive heating can lead your LED shoe battery to bulge and bubble up. It can be blasted at high temperatures within a few minutes.
This will cost you permanent damage to the battery.
Don’t worry! I have some suggestions to protect these batteries. To save your LED shoe battery, you have to store the shoes in cool and dry places.
You may keep the LED shoes in any closet that is colder than normal temperature after using them. Proper care and maintaining the cleaning process can make your LED shoe’s battery less mortal.
Don’t dare to leave your LED shoes outside on summer days or inside a closed car. The batteries will be dead then, and you will have nothing to do except buy a new one.
Moisture
You know that LED shoes are made of batteries that remain inside the heel or the rubber sole. The batteries are metallic, so there is a chance of eroding the battery with moisture.
The LED shoes are nonwater resistant and highly moisture protecting. You must have to keep them in dry and comfortable places while wearing them.
It is more acceptable because a little water or sweat can guide the battery to malfunction, which may be the reason for declining the electric wires and elements inside the back sole.
One more thing, you must avoid saving the lifespan of the LED shoe battery. Don’t apply the washing machine or water to wash those shoes.
Use a dry cleaning process to wash them. Though a rubber casing is used to protect the battery, there is no need to get the shoes wet. This will preserve your LED shoes for a long time.
Extreme Use
LED shoes are not perfect for your everyday wear. Extremely used can be an authentic reason for getting damaged on the shoes. You can wear these shoes on particular occasions to show off your choices.
The lifespan of a LED shoe is not much longer. You will get these shoes to knock out in a short period. So you must be more careful if you want them to last longer.
Remember, You can’t keep this LED shoe charged for long. Try to disconnect it as soon as the battery is fully charged.
Otherwise, the life cycle of the battery will be all gone.
Impact
Another irritating fact is you can not wear LED shoes in rough or rugged walking. Even shaking your feet too much will be responsible for disconnecting the wires.
If it happens once, the circuit will stop providing the connection flow to the LED bulbs. Then the LED lights will stop bulbing even after everything is fine.
So you must wear these shoes on smooth or plain surfaces to skip the wire disconnecting part.
Well, if you have some ugly habits like kicking walls or some hard objects, you must leave these off when you wear LED shoes.
How To Avoid Damages Of LED Light Up Shoes?
To avoid damage to the LED light shoes, you must take good care of them. You can keep the LED shoes safe and long-lasting with proper care and following some important facts.
It’s better to be alert before getting the damages. It means you have to be conscious about getting damage. You might follow these facts to skip the cracks.
Let’s jump to the facts which may save your LED shoes:
- Avoid charging for a long time.
- Don’t get your LED shoes on excessively low charge.
- Try to keep your shoes clean after wearing them every time.
- Use a dry wash process to clean them. Don’t dare to wash them in a washing machine.
- Keep them at a safe distance from water.
- Don’t leave them in too much heat.
- Store the shoes in the cupboard under your bed.
There is no ultimate guarantee that only these facts will save your LED shoes from damage. But if you maintain these rules, there is a chance to get your LED shoes long-lasting.
How To Change The Battery Of LED Shoes?
Sometimes your LED shoes will stop working while the battery is down or dead. Don’t panic! You can replace those batteries on your own. You don’t need to be an expert for that. It’s the simplest thing to do at home.
The battery compartment locates in the heel or back sole normally.
The compartment is accessible. You can open it using some tools at home, like a thin knife, nail cutter tools or any kind of needle.
Now follow me to change the old battery with a new one:
- Get a new pair of batteries. You can purchase them from any shop closer to your home.
- Flip back the shoe and unlock the outside part of the battery chamber.
- Open the battery compartment. It can be enclosed in a battery case. Or not. Sometimes there is an extra battery casing to protect the batteries from heat or water damage.
- Now lift out the battery with a thin knife or needle.
- Replace the old battery with the new one.
- Close the battery case.
- Make sure the battery is replaced very well.
- Recheck whether it’s working or not. Keep the shoe on a flat surface or your hand to be sure about lighting it up.
You can use AAA or AA-type batteries to supply the power to LED lights. Some people also use watch batteries to get the connection between the battery and the light.
The battery circuit remains in the back sole of the LED shoes. That’s the reason for the thinner sole of LED shoes. You can also exploit the watch battery. The watch battery size is cr205 or cr2032, which are just a perfect match for any LED shoes you use.
Here’s a complete guide on how to Fix Heel Slippage In Boots.
Ending Point
I know exactly how it feels when your favorite pair of shoes are ruined. It hurts too much. LED shoes are for those who like many colors with some show-off attitudes.
You must protect them as a baby!
Otherwise, your lovely LED shoes will be dead soon. Well, I have given you all the instructions to take proper care of it. Follow the instructions like your manual book and apply them.
Don’t forget to share your fixing experience in the comment section, and let me know if you find any new ideas to fix the LED shoes.


